One of the first things I discovered when building Next.js applications was how complicated managing links could become. Something that sounded so trivial quickly became cumbersome when I needed to account for things like dynamic routes, external URLs, query parameters, or user data coming from a CMS.
Traditionally, you would just toss an <a> tag with a href attribute that contains a string for all of your links, but to take advantage of the client-side route transitions that Next.js offers you'll want to use their next/link component to handle navigating to other pages within your application. You can read more about how it works in the Next.js Link documentation, but here's a basic example of how to use it:
This introduces a problem though: because this component requires a href property set to a valid Next.js route, it doesn't account for other types of links like external URLs, email addresses, or phone numbers.
Of course, you could just use a standard <a> tag for those, but then you would have to manage different pieces of code for both types. And what if you don't know what type of link it is because the data is user-defined and coming from a CMS? Or, what if you have dynamic slugs that are under a static sub-path (i.e. /post/[slug].js)? 😵💫
Instead, let's create our own custom <Link /> component that can account for all of this automatically. We will still leverage the next/link component within it, but also introduce some cool tricks to handle all different link types!
Building your own link component
Before we dig into the component markup itself, let's first define the data structure we'll be feeding it to generate our links. Just like the next/link component, we should allow simple strings to be passed as the href property, but also JSON objects that we can use to build out complex URL structures.
Here are some examples of what our link components href property should accept:
The markup
Now that we know what our href property should accept, let's start defining our new component:
With the above, we've started by accepting the href property and the children. At this stage, our component will only work with links that use a string for the href property. While any relative links will trigger a hard reload when clicked since we're not using the next/link component yet to take advantage of client-side route transitions.
Let's tackle that next: Since only links to Next.js routes need the next/link component I like to differentiate links into two types: Internal Page or External URL.
Since we want to accept strings for both link types we can't rely on the href property alone to determine the link type. Let's add another property to our component called external to help us out here.
We can use this property to determine if our <a> tag needs to be wrapped in the next/link component or not. Using a custom <ConditionalWrapper /> component, we can use this property to do just that!
Here's what that wrapper component looks like (adapted from this gist):
How it works
When the condition property returns true it will render what is defined for the wrapper property (which itself returns the component's children that you can then wrap accordingly), otherwise it will simply render the children as-is.
And here's how our updated component looks with this now in place:
But we're not done yet: there are still some issues to address within our component:
- Internal links should not contain a href attribute on the underlying <a> tag
- Allow an object as our component's href property and parse it into a valid, relative URL path
Let's tackle these one at a time!
Conditional href attribute
In the event that we are using next/link we don't actually want to pass the href property onto the underlying <a> tag, so we need to conditionally include this attribute.
We can do that with a spread syntax trick:
Notice how we're defining our href attribute outside our render as a new variable (hrefAttribute) with a ternary operator? Depending on if the external property is true or not, this variable will either be an object containing our href property or an empty object.
Then we can spread this variable onto our <a> tag, which will either include the href property or nothing at all!
Generating a route's URL path
We still haven't addressed links that pass an object in as the href instead of a string. We need to generate that internal page's URL first before applying it to next/link's href property in our render.
Let's create a new variable to define this value:
In the above, we've added a new hrefPath variable that uses another ternary operator to check if our components href property is an object or not. If it is, we pass it along to a new getRoute() function that will construct and return a string (we'll get to that). Otherwise, we just leave the value as-is.
Now our new variable can safely be passed to our next/link component!
Defining getRoute()
When we pass our object to getRoute() we want to construct a string from that data, much like the next/link component does. Let's first define the object properties we can use:
- slug (optional)
The page slug to be used when generating the URL - type (optional)
Used to define the type of page for prepending static path segments - hash (optional)
URL fragment for linking to a specific location (id) on the page - query (optional)
Any query parameters to append to the URL
With the above properties, we can build out our URL string in getRoute() as follows:
Note
In this function, you'll want to define any static path segments for your different page types in the basePath object. This selects the key that matches the type passed to it and prepends your path with its value.
For example, if we pass our object example from above to this function, it should return the following string:
Putting it all together
Now that both internal pages and external URLs are working with our component, there are a few things we can do to tidy things up:
- Disabling scroll to top on client-side navigations
(useful when you have advanced page transitions) - Automatically opening external links in a new window/tab
(unless it's an email address or telephone number) - Pass along any other properties to the underlying <a> tag
(i.e. className, event handlers, etc.)
Here's our final component markup that includes all of this:
BONUS: Integrating with Sanity
Now that we have a reusable link component that can work with virtually any link type within a Next.js application, let's make this just as easy to integrate with Sanity to handle user-generated data.
Since you're likely to use links in various places throughout your website, they should be easy to create and use the same data structure across different schemas.
Some examples include Navigation Lists, CTA buttons, and inline text links.
Link Field Generator
Why not just create a new object type? We could just define a custom type through an object schema, but a custom function that can accept arguments will allow more flexibility in what we're generating:
Note
We can also leverage the same getRoute() function that we use on our frontend to help with our Sanity preview renders!
Using in Sanity Schemas
We can now create links in our schemas by calling this function in the fields array– using props to extend any link functionality needed. For example, say you wanted to create a Navigation links array that can add both internal pages and external URLs.
That schema markup would look like this:
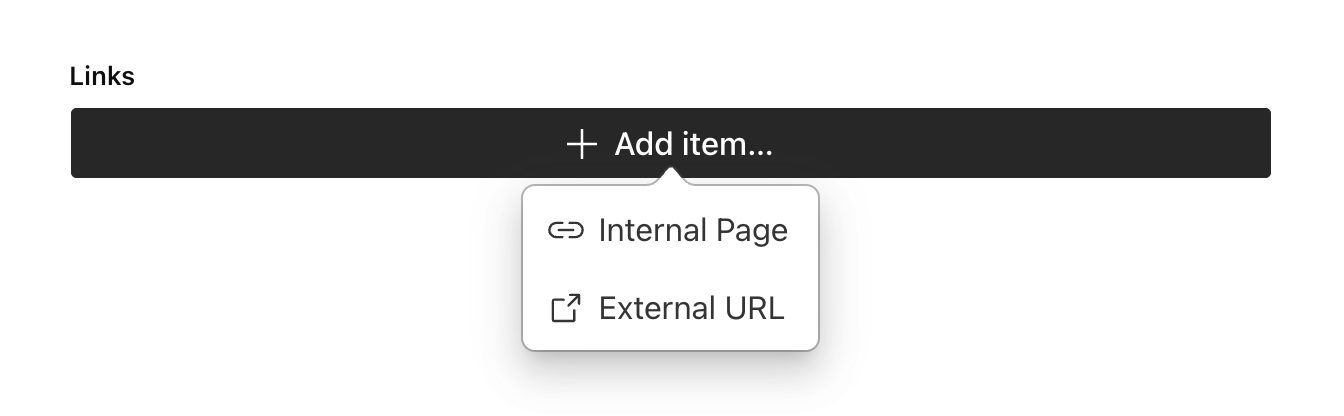
We call customLink() twice for the array fields of property for each of our link types, using the internal property to display different fields for each type.
This generates the following in the Sanity Studio:
What about one-off links? Let's say you want to create a CTA for a card component. Here's how we can use the same function for that:
Accessibility
The hasDisplayTitle property hides the "Display Title" field in favor of a "Label" field which should be used for accessibility purposes when generating the link on your frontend. This is useful when you're not linking descriptive text, but you still need an accessible label for screen readers.
Getting Link Data with GROQ
Now that we have our link fields being generated across our schemas, we'll need to get this data into our frontend. And, since all of our links use the same data structure, we can write a reusable GROQ pattern to use in subsequent queries:
For example, getting the data for the Navigation links and CTA examples we outlined above would look like this:
Passing Sanity Data to <Link />
Now that we're consistently getting link data from Sanity, we can use this data with our custom <Link /> component.
Using the example above, here is how you could display navigation links generated from Sanity:
In Summary
Handling links in Next.js can be a challenge, but by creating a custom <Link /> component that extends next/link to handle any type of link you can think of, you can significantly reduce the friction!